Skiing is an incredibly addictive sport and one that the whole family can enjoy. People who never ski often wondering is it easy to ski for the first time. They think of the way to learn or teach kids to ski. Hiring a ski coach is the most efficient way to learn skiing. If you have no budget for ski lessons, this is a beginner guide for adults and kids learning to ski.
It’s fun and not challenging for people to learn to ski themselves. It depends on the individual. Generally, it takes 2-4 hours to learn the fundamentals. For some getting to the points takes less time, and for others, it can take more.
Follow the step by steps shown below, along with essential tips and knowledge, you can make it happen!
Side Note: We agree all the teachers have their own teaching method. There are a lot of ways to get to the same point. Likewise, there are so many ways to teach a ski lesson. Let’s encourage us to learn from others, share information, and talk. Let this incredible sport overflow the world.
Table of Contents
How to Teach Yourself to Ski with No Experience?
It’s always good to understand the knowledge and practice. Here I’m giving you straightforward steps and tips for true beginners on first-day skiing.
Total Time Needed: 2 to 4 Hours
Total Cost: 0
Required Tools: Skis, ski poles, ski boots, ski helmet, ski goggle
Things Needed? Wear proper ski gloves, a ski jacket and ski pants.
Step 1
Get to know your gear and learn to walk with ski boots.
The boots should be dry and snug, yet the ankle should not feel locked, stuck or fixed into a position.
Take a walk with ski boots and pay attention to your ankle. When your shin hits the front of your ski boots, you can feel it. It’s normal. You may feel the ski boots like a case.
Also, do sidestep practice. You can tip and get to the side of your boots a little bit.
Step 2
Get into skis and learn how to take off. Three things to notice before you get into skis. These are coming in handy.
There’re ski breaks that will keep your skis from sliding away from us if it even falls off. Also, a metal called edges grabs snow and mountain. Remind yourself skis are extended base support. Because your boots are short, and the sudden you wear skis may cause you an unusual feeling.
You only put one foot into a ski at the very beginning. I suggest you only place one foot in first because it’s easy to build confidence at the first time. First, grab your poles and straddle your skis. Pick up on foot and take off all the snow, so the binding works properly. Now toe in first, then click down, voilà!
Now walk in a circle to get used to this extended base of support and its weight. Try to walk and step around just baby steps, don’t make a big step because it doesn’t work.
Next, walk sidesteps at flat and uphill. You can roll the ski on edge to sidestep up so that the skis grabs snow. If you don’t find that edge, your skis will slip down. Notice that your foot lower legs affect skis a little bit.
Also, practice herringbone, aka duck-walk, for walking uphill. This is what duck-walk looks like—Click here>>
Before putting another foot into the ski:
- Make sure your body stays on top of your feet and keeps up while sliding.
- Don’t get left behind your feet.
- Give yourself a little push and look for a glide to practice this.
- Learn how to take ski off
You gonna balance on foot with ski, and you’re safe because you have other foot to stop. While gliding, push everything (including shin) forward into the ski tip. Push and glide until you get the sense of that.
When you take skis off, take the ski pole and pull down on the heel lever on the back of the binding while taking your weight off the boot’s heel.
Putting On and Off Skis Video>>
Now put both feet into skis and practice again: walk straight, walk in a circle, walk sidesteps, duck-walk.
Step 3
Learn to make a wedge to snowplough (or called Snowplow). Snowplough is an essential skill for gliding. To do wedge, you put skis parallel, called ‘french-fly.’ Then steer toes in for your wedge and make skis in a triangle shape called ‘pizza.’ It’s the way to slow down or stop by changing the “pizza’ size. The wider, the slower.
Don’t put your feet too close when steering. Because when you steer your toes in, the ski tips gonna cross.
Remember we practice walking in a circle? You can put your poles below you and just take baby steps to change your direction.
Put your poles in front of you whenever it’s downhill, and you’re not really comfortable. So that you don’t slide forward. On the other hand, put your poles behind you whenever it’s uphill so that you don’t slide backward.
So make your first snowplough. All you are going to do is:
- Duck-walk up to the hill, so you don’t slide away.
- Put your poles in front of you, and make skis into a ‘french-fry’ position.
- Let yourself go, make a ‘pizza’ (steer toes in), and come to a stop. Well done!
Side Note: How many times and how long to do ‘french-fry’ and ‘pizza’ are on your call. If you’re comfortable, ‘french-fry.’ When you want to slow down or stop, ‘pizza.’
Tip: Don’t forget to stand up tall, make your shins at the front of boots, and your whole midsection works forwards to your ski tips.
Practice a couple of times, and you’re ready for the next step.
Step 4
Learn to snowplough turns(Snowplow turns). Now you can ski parallel, control your speed in the plough, even change the “pizza’ size a few times. Once you got the confidence, you can try to change the direction and do snowplough turns. The side you put weight on in a snowplough will affect where you travel. Put weight on:
- Right side ski, turn left.
- Left side ski, turn right.
If you keep everything even, the weight nice and centred, you will straight line.
Let’s get started!
You need to put your poles in the front, look forward and start to glide. Push into a snowplough, and slightly push more on one leg to change the direction to left or right.
You may adequately find one direction more manageable than the other. That’s normal. Keep practising, and you will make it better.
Now, let’s put snowplough turns together and link them down to the hill. We want to avoid the feeling of trying to turn in one fell swoop. Turning the left ski, straighten up, spend a moment face down the hill, then start next turn.
Don’t think of it as a massive change of direction. When you look back at your tracks, you want to see a nice smooth S shape, not a zigzag.
Snowplough turns Video with Tips>>
Step 5
Learn how to get on and off the chairlift. Once you’re in the queue, you will see the gate open and close ahead of you as people move through the chairlift.
To get on the chairlift, with your poles in one hand, pass the gate, little shuffle up to the line, and put the other hand back to guide yourself onto the chairlift. Then once move away, and you sit down, pull the safety bar down over your head.
As you approach the station, you want to be ready to push the bar up and point your ski tips up slightly. Keep your skis parallel, stand up, push yourself and slide forward from the chairlift.
Congratulations, you’re ready to go!
How to Teach Toddlers and Kids to Ski?
Skiing is an excellent winter activity for toddlers and kids to have fun while staying fit. Teaching them to ski will set them a lifetime of loving snow and unique family memories. Below is a step by step guide for parents to teach toddlers and kids to ski.
Side Note: The teaching method and matters needing attention differ from kids’ development and health. Here’s a simple teaching guide for all ages. If you want to know more details for specific ages:
- Skiing with 1 to 2 year old
- Skiing with 2 to 3 year old
- Skiing with 3 to 5 year old
- Skiing with 6 to 12 year old
(Updating)
Total Time Needed: 2 to 4 hours
Total Cost: 0
Required Tools: skis, ski poles, ski boots, ski helmet, ski goggle, wedges (option, check step 1), ski harness (option, for kids under 5)
Things Needed? Wear proper ski gloves, a ski jacket and ski pants.
Step 1
Understand ski equipment. Unlike adults, using a wedge and ski harness to teach toddlers to ski can help. Wedge is a ski tip connector to keep children’s skis in a safe position. If you find kids can’t keep skis in a confident stance, you can use it.
Side Note: Kids can’t duck-walk because their ski tips have been connected. Suggest only use when they are going downhill for safety.
Another item parents would love to have a ski harness, a.k.a. backpack ski trainer. When my friend trained his three-year-old son to ski, this backpack gave him the confidence to get his son upon the ski lift. When he was about to leave the chairlift, pull the handle up in one hand, and he got other things on the other hand, quick and easy. While his son skied downhill, he could ski behind him and ensure safety.
Explain these two items to kids if you use them, helping them understand why they need them. Once toddlers have reasonable control, you can remove the wedge and ski harness, and they can actually ski.
Tell them: You are like Iron Man now, so feeling about all the gear. The helmet and the goggle help you see clear and protect your head while skiing. You’ll notice you walk like a robot with ski boots on. That’s normal. The ski boot will create powder to move. Make sure it’s comfortable.
Or, you can create your own version for your kids. Kids love these stories.
Step 2
Get into skis. Let them get into skis and get used to their equipment. They will learn to ski quick. Tell them ‘toe first, heel second.’ to get into skis.
And let kids practice walking parallel and in a circle. Teach them to walk by the baby steps(small steps) instead of significant actions. Another walk similar to baby steps is shuffle, to walk by pulling your feet slowly along the snow. We often shuffle to get on the chairlift.
Next, practice sidesteps and duck-walk with both skis. These two skills are two common ways to go uphill. You need to tell them what does each means so that they know what to do when you call the action.
- Sidestep: point both tips in one direction and take small steps up to the hill sideways.
- Duck-walk: walk like ducks by putting the skis’ tails together and the skis’ tips wide.
Play calls to actions game with them. So they can remember that.
Step 3
Learn to snowplough (Snowplow). At this stage, they need to understand and know how to make ‘french-fry’ and ‘pizza.’
- French-fry: Keep skis parallel. It’s the way to get you to speed up or move again.
- Pizza: putting the skis’ tips together and the skis’ tails wide. This is the skill to slow down or stop from gliding—the wider, the slower.
Tip: ‘French-fry’ and ‘pizza’ are basically go and stop. ‘French-fry’ means go. ‘Pizza’ means stop.
Help them remember and learn by game calls Teacher Says. Also, you can take them to a slight pitch to practice.
Step 4
Learn to get on and off the chairlift. Kids under 5 get on the chairlift for the first time. You can pick them up a little bit to help them sit on the chairlift. Or, you can use a ski harness to lift kids to the seat by pulling the handle on the bag.
Older kids can put their poles in one hand, pass the gate, shuffle to the line and use the other hand to help themselves onto the seat. Once get on the chairlift, always pull the safety bar over their head.
Always keep one hand on your kids just in case kids are slippery. You don’t want them to fall from the chairlift.
When you get to the station, give kids a countdown to help them anticipate getting off the chairlift. Then tell them to make a ‘french-fry’ to get off the chairlift. E.g. 5, ,4 , 3, 2, 1, french-fry!
Always encourage kids instead of scolding them. So that they would find confidence, learn better, and much more enjoy this new sport.
What to Expect When First Time Skiing
- Beginner’s area
- Fall
- Don’t get intimidated
When skiing for the first time, you will fall, and that’s okay. There’s a flat beginner area and a minimal nursery slope for people who first-time ski to practice. Same way to let kids understand that they will lose balance and fall. It hurt, but also fun. Don’t forget to laugh at yourself when you fall.
The first time teach my niece and nephew ski, we always laughed when we fell and even made it looks funny. They thoroughly enjoyed learning without fear. Then they got confidence and started to make their first turn and speed up.
Therefore, you may be slow and shaky until you get confidence. Don’t put yourself off. You’re doing well.
Stay Fed and Watered
Eating and drinking water throughout the day sounds obvious but easily forgotten when on the mountain. It’s often like you skiing all day and realise you haven’t had a drop of water when you reach the bottom.
Skiing is a physical exertion sport, and it does cause as much dehydration and uses as much energy as any other sport. So you need to keep the nutrition and water yourself throughout the day.
The good thing is most resorts have free water stations to save money on bottled water. Some ski resorts even have mid-mountain and backside cafes and restaurants. That means you don’t have to go down to the base to get a bite to eat or a drink. It is easier to refuel and hydrate, especially when you ski with kids.
In my and my friends’ experience, feed your kids and yourself well before skiing, bring your own sports bottles, and prepare some pocket snacks can help you avoid eating at mid-mountain.
Considering some people may plan with a budget or be conscious of spending, ski resorts are not cheap, and eating at mid-mountain is expensive. If you want to stay on your budget, abstaining from ski resort food is one of the keys.
I always refuel water before hitting the slope and prepare some energy bars, small nut packs, and rice crackers in my bags. My friend often brings kids juice packs, sandwiches or burgers, and fruits for lunchtime. So we don’t get cranky, hungry kids while skiing. After all day skiing, we packed everything, went to some budget-friendly, tasty restaurant, and had our big meals for the day. Happy wallet!
Skiing Terms and Slangs Good to Know
Skiers in the world enjoy plummeting down mountains and using slang that you might not fully understand.
However, if you wonder what it means, I have provided a brief definition to help you.
Alpine Skiing: Downhill skiing. Not telemark or cross-country, and just skiing. Down a hill.
Après-ski: Means “after-ski.”
Backcountry: Also known as off-piste. Skiing in more remote parts of the mountains.
Balaclava: It’s a facemask worn to cover exposed skin.
Carving: Turning on the edges of skis to clean turns.
Dump: Slang term for an epic snowfall of fresh powder.
Gondy: Also known as a Gondola. It’s a boxed chairlift that can take you to the top of the mountain.
Grooming: A groomed trail at a ski resort that is manicured by machine.
Liftie: A slang term for a ski lift operator.
Pow (Pow-Pow): Light, dry, fluffy snow generally as powder.
T-Bar: Like a button lift, but shaped like a ‘T’.
Tracked Out: Generally means the snow is no longer fluffy. It is a bit icy and not as easy or fun to ride down.
White Out: When heavy snow falls, your visibility drops to almost nothing.
Now commit them to memory and use them wisely. You can talk like a ski pro.
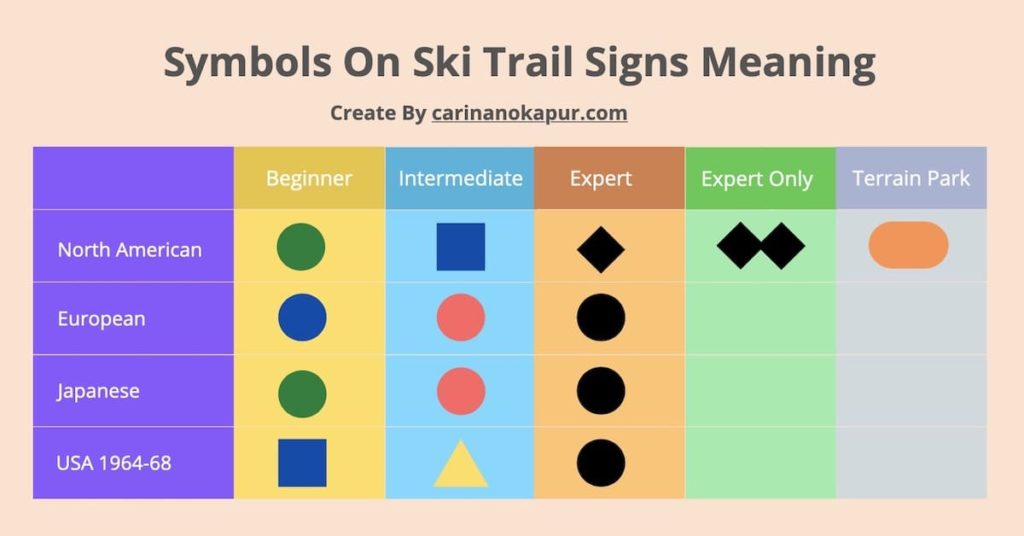
Skiing Trail Difficulty Symbols
Skiing trail difficulty symbols refer to a ski trail designation system.

FAQs
Here are some questions my friends frequently ask.
Conclusion
Skiing for the first time is excited and fun experience, and you’ll have a good memory when you look back. Spend 2 to 3 hours to learn basic ski skills, and making your first run will encourage you.
Once you get confidence, you will go fast and ski through trails. However, many great talented ski coaches and lessens if you feel you need help.
Hope this article help you accomplish something.
Don’t miss other ski equipment reviews if you enjoyed this and are looking for ski equipment. Click Here>>


